The Fried Liver Attack
November 27, 2021 - Chess
In this post I wanted to share one of the chess openings that I love playing as white, The Fried Liver Attack. It is not considered a great opening for master-level players, or even strong players below the master level. But for everyone else, The Fried Liver Attack is an extremely aggressive approach that most players will have trouble defending well.
- Entering The Italian Game
- Going on the attack
- First variation: queen to e7
- Second variation: pawn to d5
- Third variation: Traxler Counterattack
- Parting thoughts
Entering The Italian Game
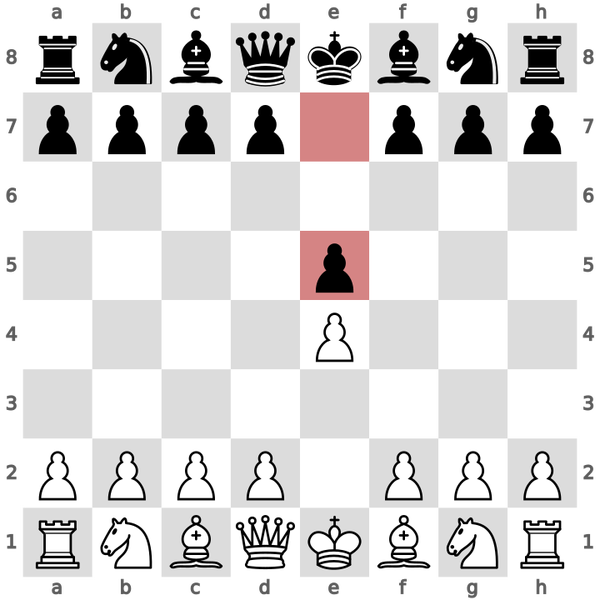
The Fried Liver Attack starts with The Italian Game. You begin by playing the king’s pawn to e4, hoping for your opponent to answer with their king’s pawn to e5. If your opponent plays something else, like e6 (The French Defense), d6 (The Pirc Defense), or c5 (The Sicilian Defense), you cannot enter The Italian Game. But, at the beginner levels, the most common answer is e5.
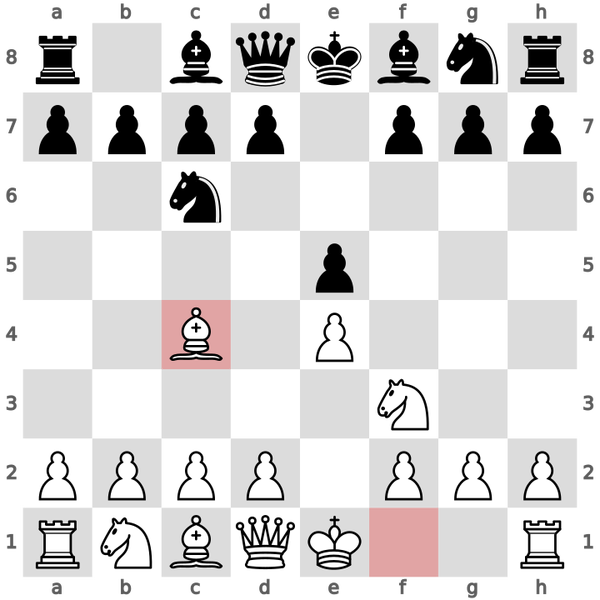
Next, we want to play the king’s knight out to f3, attacking black’s pawn on e5. To protect the pawn, your opponent will most likely play their queen’s knight to c6. This is by far the most common move you will encounter, because it helps your opponent develop their knight towards the center. If instead they play the queen’s pawn to d6 (The Philidor Defense), or play their king’s knight to f6 (The Petrov Defense), then you cannot enter The Italian Game. But, once their knight comes out to c6, then we play our bishop to c4 to enter The Italian Game.
Going on the attack
Now comes the critical decision point for our opponent. By far the two most common moves by black are the king’s knight to f6 or the king’s bishop to c5. The critical move we are looking for is the knight to f6. If your opponent plays their bishop out to c5, then I would recommend The Evans Gambit instead (I will cover this in a future post). More rarely, you may see your opponent push a pawn to a6(The Anti-Fried Liver Defense). As the name implies, The Fried Liver Attack is no longer possible, and you should instead opt for an attack in the center with d4 (also part of a future post).
But, let’s suppose they play their knight out to f6. We are ready to spring our attack by jumping ahead with our knight to g5. Why can we only do this if black plays their second knight out to f6? Because that knight on f6 blocks the queen from being able to attack our knight on g5.
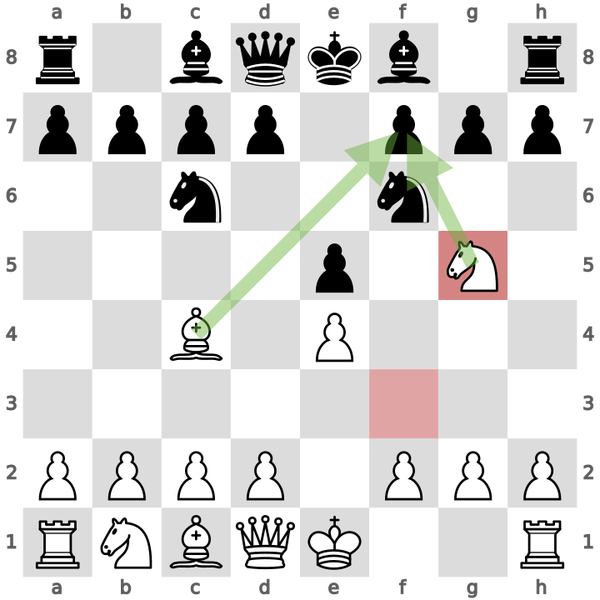
Our knight on g5 accomplishes two things. First, our opponent’s last move, knight to f6, attacks our pawn on e4, and our knight on g5 defends it. But more importantly, our knight teams up with our bishop to attack the f7 pawn which is only protected by black’s king. If black allows us to get our knight on that f7 square, then we can create a double-attack on the queen and rook guaranteeing that we capture one of those pieces. Therefore, black must react quickly and aggressively to have any chance. Let’s take a look at some possible responses that black could play.
First variation: queen to e7
The only piece that can provide extra defense to the f7 pawn is the queen. So, a common move is sliding the queen over to e7. This also prevents our knight from forking the queen and rook if it captures on f7. However, this is a losing strategy for black, because the queen isn’t going to capture on f7. I will explain why shortly.
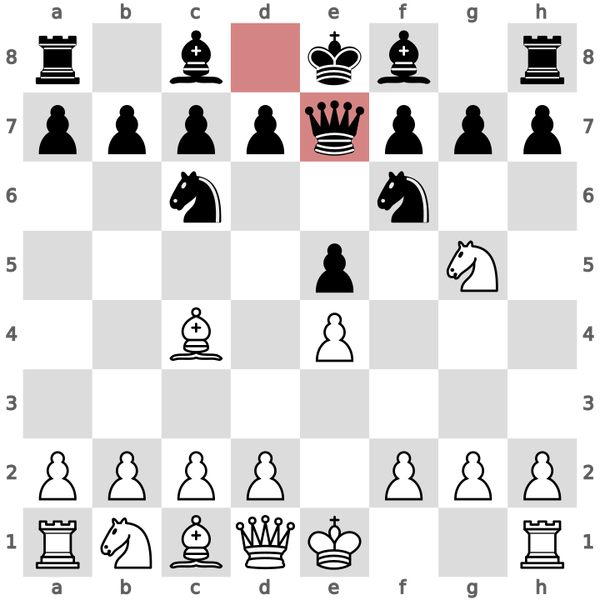
When the queen comes out, we can just go ahead and capture on f7 with our bishop and give a check to the opponent’s king. We capture a pawn, and force the opponent’s king to move, so they can no longer castle. The king is forced to move to d8.
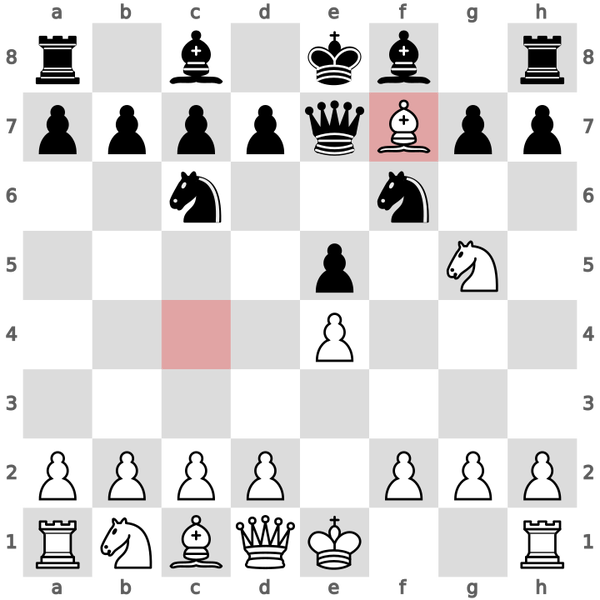
Alternatively, black can choose to capture our bishop on f7 with their queen. But then, we will happily take their queen with our knight, and they will recapture with their king. When the dust settles, we have exchanged our knight and bishop for a queen, and black’s king can no longer castle. This is why the only good move for black is to move the king over to d8.
Now, with the king displaced, let’s retreat our bishop back to safety on b3. You will notice that doing this opens up the f7 square for our knight to fork the king and rook.
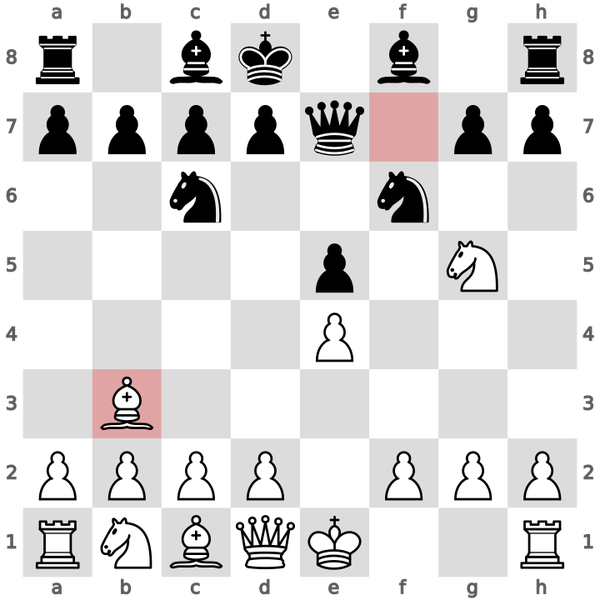
If black allows you to fork the king and rook, and absolutely take the opportunity and pick up the rook. Otherwise, we have emerged from the opening with an advantage. It’s time to castle and develop the rest of our pieces towards the center in order to launch an attack on the enemy king. The queen to e7 variation is nothing to be afraid of.
Second variation: pawn to d5
Slightly more astute players will recognize that they could block the bishop’s vision of f7 by advancing the pawn to d5, and attacking our bishop.
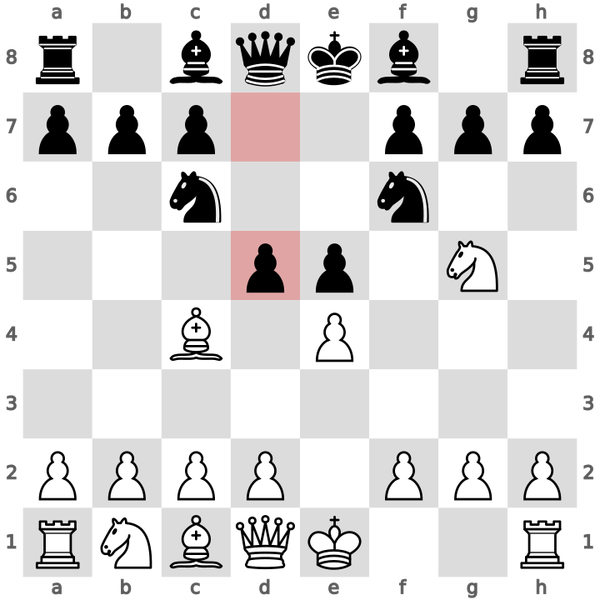
From here on, our following moves are quite natural. We simply capture the pawn on d5 with our pawn on e4. This removes the attack on our bishop and counterattacks our opponent’s knight.
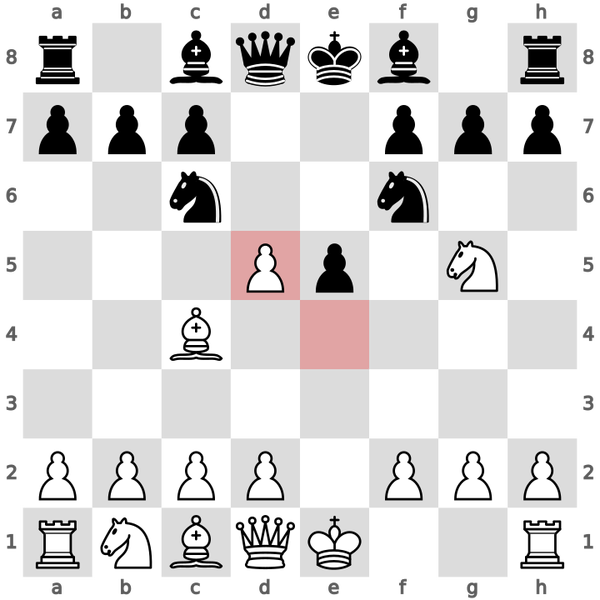
Here, black has to do something about our annoying pawn on d5 otherwise they lose the knight. If they move their knight, then we can just advance d5 to d6, and bishop and knight will once again team up on f7. This is very bad for black. Obviously capturing on d5 with the queen just loses a queen for black. So, black will capture with their other knight on d5.
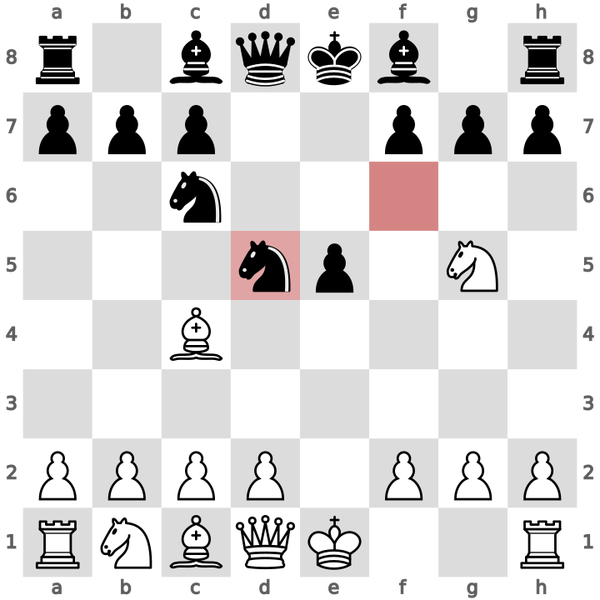
This is where a lot of players with the black pieces will go wrong. They will think they’re safe because the bishop no longer has vision on f7, and the knight is under attack by the black queen. You will be tempted to move your queen’s pawn to d3 in order to allow your dark-squared bishop to defend your knight. But, there is a much more devastating move. We can capture on f7 with our knight.

This is a surprising move that looks like it’s a blunder. The knight is undefended, so the king can simply capture it. But, this is exactly what we want. Black is almost forced to do this. If they do not, then they lose their queen or rook. Once the king captures our knight, we can then bring our queen our to f3 and give a check to the king.
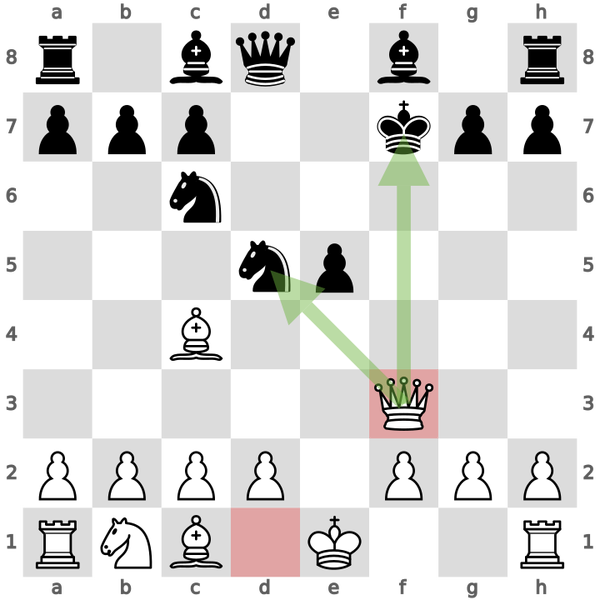
In addition to giving a check, our queen is now a second attacker on the knight on d5, which is currently only defended by black’s queen. We are threatening to capture the knight and re-gain the knight that we just sacrificed. If black doesn’t add another defender to the knight, then feel free to just take it. However, the optimal move for black is to simply move their king to e6 to defend the knight.
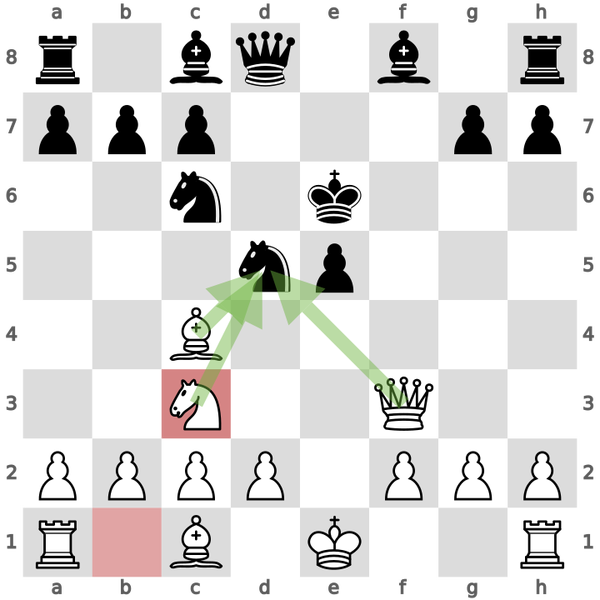
At this point, you have drawn the opposing king out into the middle of the board, and can continue to apply pressure to the knight on d5 by developing your own knight to c3. You have emerged from the opening down a knight, but with a powerful attack against the enemy king.
Third variation: Traxler Counterattack
This is by far the trickiest variation that black can deploy. After we begin our knight attack, and have two pieces eyeing the f7 square, black can choose to ignore our threat, and play their bishop out to c5.
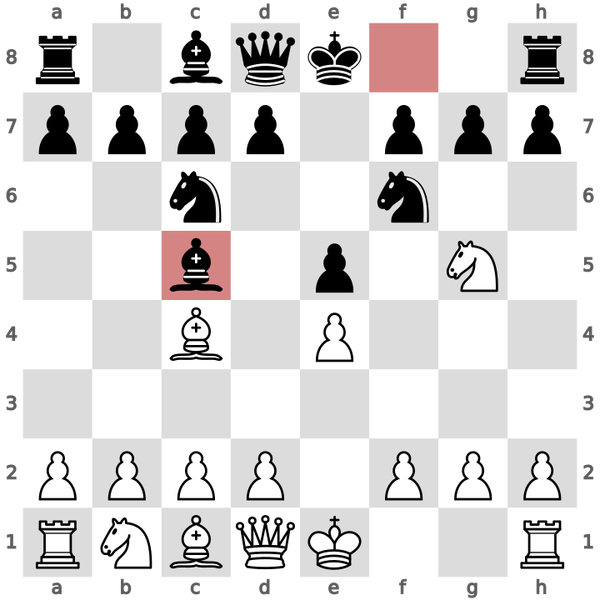
Essentially, if we continue with our plan of capturing on f7 with the knight, then black will sacrifice their bishop on f2! This forces our king to capture the bishop and come forward.
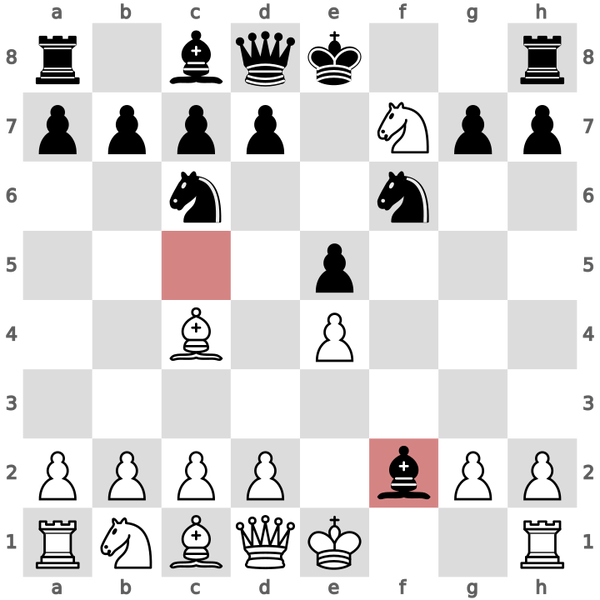
They can then follow up with checks from their knight and queen. All the pressure that we wanted to apply to black is now being applied to us. We are better off avoiding all these complications. Instead of capturing with the knight on f7 when our opponent launches The Traxler Counterattack, we should just capture with the bishop, and give a check.
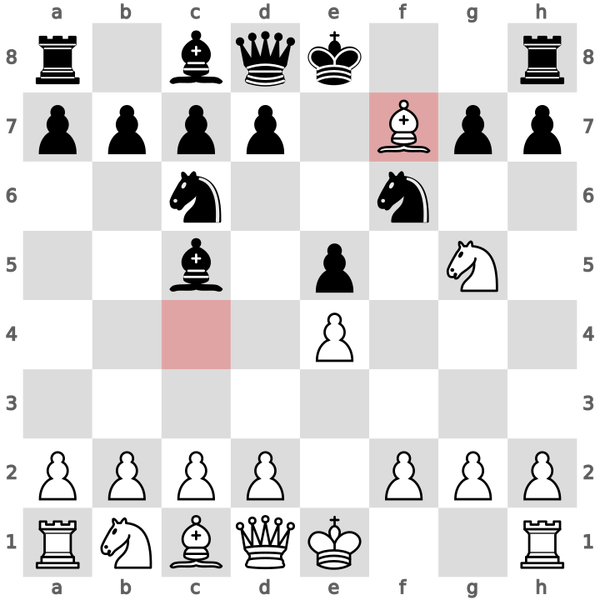
Then, we can retreat our bishop back to b3 and castle. You might wonder why we can’t just castle immediately. This would be a mistake, because your opponent would simply push a pawn to attack your knight. If you move away your knight, then your bishop becomes undefended.
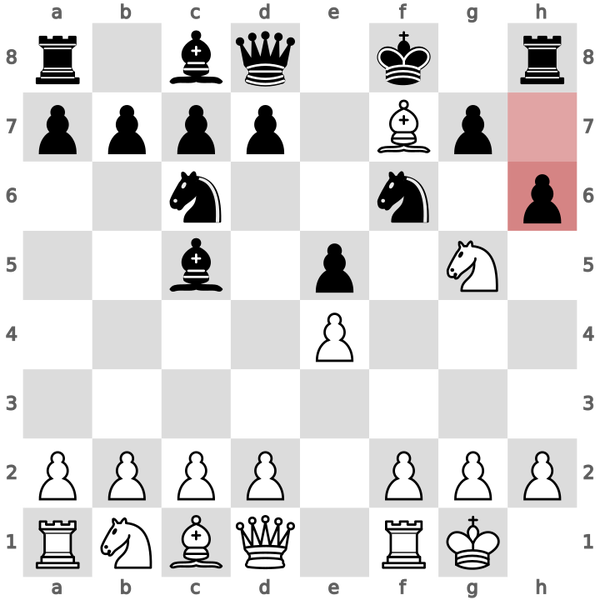
You do not need to castle immediately, because if black still insists on sacrificing their bishop on f2, they do not have a follow-up check with their knight to e4, because that square is defended by our knight on g5. So make sure you retreat your bishop before castling.
At the end of this Traxler variation, black has lost a pawn and the right to castle. We have emerged from the opening with an extra pawn, and removed our opponent’s right to castle, so we have the advantage.
Parting thoughts
There maybe other unorthodox variations that have been tried against The Fried Liver Attack, but you are unlikely to encounter any of them at the beginner or intermediate level. The queen to e7, pawn to d5, and The Traxler Counterattack are the ones you will almost always encounter. This might seem like a lot of information to process, but just remember that the goal of The Fried Liver Attack is to continuously apply pressure to the f7 pawn, and remove black’s right to castle. If you get overly greedy, and don’t pay attention to your opponent’s moves you might find that this opening backfires.
The Fried Liver Attack is not played by grandmasters, and is considered highly dubious, but what’s the point of playing super precise and positional chess if you’re not having fun? At a certain point, you will find that players stop allowing you to play The Fried Liver Attack, because they recognize the dangers, but that’s why it’s important to augment your repertoire with other attacks such as The Evans Gambit. But, if your opponent just plays their two knights out into the middle of the board, why not make them pay for their boring play?
Let me know what you think about this article by leaving a comment below, reaching out to me on Twitter or sending me an email at pkukkapalli@gmail.com