Introducing Emblem Snake: creating an app with LitElement and Docker
September 28, 2020
In Metal Gear Solid V: The Phantom Pain, you play as Venom Snake, a soldier for the Militaires Sans Frontières (MSF) mercenary group who has been in a medically induced coma for 10 years. He discovers that the MSF has been dissolved and replaced by the Diamond Dogs. Apart from completing various missions, Snake is tasked with improving and defending the group’s Mother Base, an offshore military base near the Seychelles. To customize your Mother Base, the game allows you to design an emblem. This custom emblem will then be emblazoned all over Mother Base, displayed on vehicles used by the Diamond Dogs, and worn by Venom Snake himself. But, it isn’t possible to export the image out of the game, so I decided to make a webapp to turn my emblem into a phone or desktop wallpaper. It became an excellent opportunity to learn about LitElement and Docker. Be sure to check out the app on emblemsnake.com, and find the code on GitHub.
- TL;DR
- How emblems are made
- Getting the image assets
- Creating the webapp
- Rendering the preview
- Deploying everything
- Parting thoughts
TL;DR
Just wanted to write about my experiences creating this app, and share some of the knowledge I gained.
- I created an app using LitElement, a Web Component library created by Google’s Polymer Project.
- The images assets were scraped from the Metal Gear Solid Fandom site with Scrapy.
- And, the rendering for the preview images, and wallpapers is done by a Node.js service running on Docker.
- The app is deployed at emblemsnake.com, and the code is available on GitHub.
How emblems are made
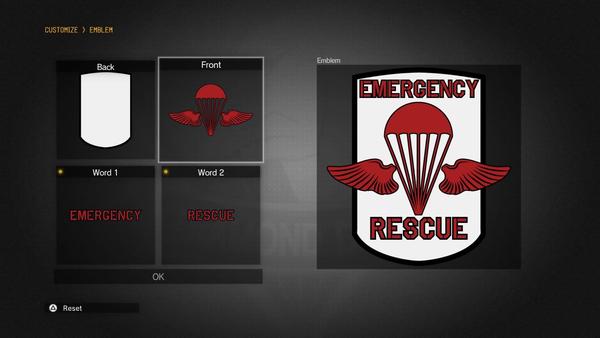
Each emblem consists of four parts, a back, a front, and two words. Each of these parts is an image, like a shield, fox, dragon, etc. Then each of these individual parts can be colored, moved, scaled, and rotated to create an emblem.
Getting the image assets
I scraped all of the black and white images using Scrapy and crawling the Metal Gear Solid Fandom site. This was pretty straightforward using the FilesPipeline, which takes image URLs and outputs files.
Creating the webapp
Since I was interested in trying out some new libraries, I decided to use LitElement. Getting started is fairly straightforward, thanks to the open-wc website which makes it simple to start a project with npm init @open-wc. One thing to watch out for is all of the configuration files that the scaffolding script creates. You probably do not need most of them starting out. I initially wanted to use something like Parcel to get a project that just works out of the box, but had trouble getting it to work with LitElement.
Using LitElement is fairly straightforward, and has many similarities to React. The only caveat would be that since all of the component is markup is available as JS template strings, you definitely need an editor plugin to make sense of it. The open-wc website has several recommendations.
A common pitfall you’ll definitely want to watch out for though is how you declare property values. Spot the difference between the following two snippets of code:
<my-custom-element
  myProp=${someJSValue}>
</my-custom-element>
vs.
<my-custom-element
  .myProp=${someJSValue}>
</my-custom-element>
The . before the property name, myProp is essential to whether the value is passed properly. If you forget the ., then you’ll end up with a cryptic error that you’ll probably be debugging for a while. Something like this depending on the object you’re trying to pass:
Uncaught (in promise) TypeError: Cannot read property '0' of undefined
You can also avoid this issue during development if you use the lit-plugin for Visual Studio Code.
Rendering the preview
To render the preview, you have to take up to four separate image files, apply two colors to them, and then write them all onto a single canvas. This means iterating through all of the pixels in four images to apply the colors properly.
First attempt: 2D HTML Canvas
At first, I tried to implement the entire app as a purely static website, i.e. no server-side logic. This proved to be difficult because pixel-by-pixel HTML Canvas operations are CPU-intensive, and make the UI laggy. I quickly realized writing four images to a big canvas after every editor operation was infeasible. Even rendering each of the parts on their own canvas was not enough of a performance improvement. Given that the canvas operations were happening on the main thread, it meant that the user could not interact with the app while the drawing happened.
Second attempt: OffscreenCanvas and web workers
Browsers do provide an API for creating multi-threaded applications, called Web Workers. Traditionally however, Web Workers did not have access to the Canvas API. However, the introduction of the Offscreen Canvas API is starting to change this. The technology is still considered experimental though, and does not have widespread browser support. Using an Offscreen Canvas means that I would have to write two versions of my app, one that uses Offscreen Canvas, and one that uses the Canvas on the main thread. The amount of code required, and the bad experience for most users made this approach infeasible as well.
Third attempt: WebGL shaders
WebGL is a browser implementation of the OpenGL ES specification, a graphics API for embedded environments. WebGL provides a way to run graphics operations on the GPU rather than the CPU, which should lead to fast rendering. However, as I was learning about shaders, and the underlying mechanisms for WebGL, I realized that the added complexity and time investment was not worth it. WebGL still runs on the main thread unless you are able to use Offscreen Canvas, so it does not fix the core issue anyways.
Fourth attempt: Server-side rendering
So, the only remaining way left was to defer the rendering of the preview to a web service. Implementing this on a Node.js server using node-canvas was pretty straightforward. However, it’s impractical to have a server call every time you move one of the parts, or rotate, or scale, etc. So, I essentially just render previews for each of the parts individually, then apply positioning, scaling, and rotation using CSS transforms.
The complication arises when you have to make sure the preview matches the downloaded image. This is further complicated by the fact that the preview on the webapp has a dynamic size, so all of the transformations have to be expressed as percentages. CSS transforms handle percentages out of the box. By simply forcing all emblems to be square, the calculations on the server when rendering an emblem became straightforward, and it became easy to mirror CSS transforms.
Creating a Docker service
Given that node-canvas relies on third-party libraries that are not accessible on any cloud provider’s Node runtime, I had to wrap the draw service in a Docker container. This was my first time deploying anything using Docker, and the flexibility and ease of use was impressive. Docker can package up your application code along with any system dependencies such as Cairo, libjpeg, etc. So, I was able to create an Express server that simply took into a configuration object, and produced an emblem image. Creating the container image itself was surprisingly straightforward, and fairly close to the Docker tutorial. Here’s my entire Dockerfile:
FROM node:current-slim

WORKDIR /usr/src/app

COPY package*.json ./

RUN apt-get update && apt-get install -y \
  build-essential \
  libcairo2-dev \
  libpango1.0-dev \
  libjpeg-dev \
  libgif-dev \
  librsvg2-dev

RUN npm install

COPY assets assets
COPY drawserver drawserver

EXPOSE 8080

CMD ["node", "drawserver/server.js"]
Install my dependencies, expose my server’s port, copy my image assets and source code, and just run the Node script. Dead simple.
Deploying everything
While all the previous steps came with their own frustrations, deploying the service actually ended up being the most frustrating and time-consuming aspect of this project. The main complication has to do with the fact that the preview rendering service and the actual web app are completely separate. So, I needed to do the following steps:
- Deploy a Docker container
- Point my static web app to the Docker container
- Deploy the static web app
- Point my custom domain to the static site
First attempt: Netlify
Usually when it comes to static site hosting, I default to Netlify as they allow custom domains and provide SSL support on the free tier. Moreover their interface is extremely user-friendly. Unfortunately in this case, I ran into an issue where Netlify automatically tried to build the Pipfile in my project, but failed to do so because Python 3.8 is not yet supported by their build image. Since it is not possible to skip this step when uploading your project to Netlify, I had to look for an alternative.
Second attempt: Google Cloud Storage and Google Kubernetes Engine
Next, I thought it would be good to explore Google Cloud since they have a generous free tier, and I’ve never tried it before. The first thing I was immediately struck by was the complexity in comparison to Netlify. On Netlify, the only configuration you needed to be concerned with was which command to run to build your site. On Google Cloud, there’s quite a lot of configuration options, many of which can cause your bill to skyrocket if you are not careful. Eventually, I ended up following the tutorial on Google Cloud’s website to create a load balancer, provision an SSL certificate, set up a Google Cloud Storage bucket, and point my domain name to the bucket.
And, to deploy my Docker application, I followed Google Cloud’s tutorial on deploying containerized applications. This tutorial shows you how to deploy your Docker container to a Kubernetes cluster. However, what I quickly realized was that this actually incurs a huge Compute Engine bill, because the Kuberenetes cluster only provisions instances outside of the free tier.
Third attempt: Firebase Hosting and Google Cloud Run
After noticing that my Compute Engine costs were completely unsustainable, I searched around for alternatives. First, to fix my site hosting costs, I switched to Firebase Hosting, which provides all the same core features as Netlify on their free tier. Moreover, since it’s part of Google Cloud, I was able to just continue using my existing Google Cloud project.
Then, to deploy my Docker container, I found Google Cloud Run. It was simple to link my Git repository, and have Google Cloud deploy the container behind my custom domain. Moreover, it does not charge you for the time when your instance is not receiving traffic. When you use Compute Engine, you’re essentially renting a machine on the cloud, so you’re charged whether the machine has any traffic or not. A Cloud Run instance on the other hand will only charge you for the traffic you receive. So your side projects and hobby projects can happily operate on the free tier.
Parting thoughts
All in all, this project was a good learning experience, and I got exposure to a whole range of new technologies, which I can use in the future. Let me know what you think about the app, and how I can improve on it.
Let me know what you think about this article by leaving a comment below, reaching out to me on Twitter or sending me an email at pkukkapalli@gmail.com