How to do Web Scraping and Data Analysis with Scrapy, SQLite, and Jupyter
August 03, 2020
This is a walkthrough of the tech stack that I use to gather and analyze sports. It should apply just as well to any data on the internet though. I’ve used this tech stack to publish a couple of articles, Dispelling Eagles Injury Myths and Is the NFL serious about concussions?, using data from Pro Football Reference. I’ve also published the code on my nfldata GitHub project.
- Why should you care?
- TL;DR
- Setting up your project
- Gathering the data
- Storing the data
- Analyzing the data
- Parting thoughts
Why should you care?
In today’s world, customers, managers, and engineers want to know that the decisions they make are based on hard data. This, in part, led to the rise of machine learning, which often involves deriving insights or decisions from data. In my opinion, a fundamental part of machine learning is the ability to gather, and organize data. If you don’t have good data, you can’t have a good model.
TL;DR
In case you’re just curious about the stack, and don’t want to read all of the details, here’s a high level overview:

Setting up your project
First off, I use Python, because it’s simple, and has a huge ecosystem of libraries. For most libraries, you can usually install them globally using pip. However, if you want to prevent dependencies from clashing between your Python projects, you can use Pipenv or Poetry. These tools silo your dependencies inside of a virtual environment specific to each project. I personally use Pipenv, but a lot of the Python community these days uses Poetry.
Once you’ve installed Pipenv, go to an empty directory, and set up your project with these commands:
pipenv --three
pipenv shell
The instructions would be similar if you use Poetry instead.
Gathering the data
Now that we have our Python project set up, we need to install Scrapy. Scrapy is a framework that makes it easy to extract data from websites. It’s simple to install, and start a new project:
pipenv install scrapy
scrapy startproject <name>
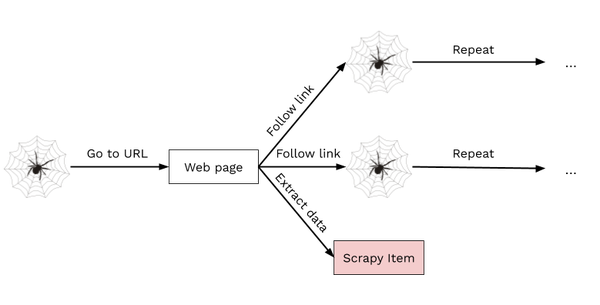
This should scaffold out a new project to get you started. Scrapy works by defining Spiders which crawl a website and emit Items. These Items are data that you can process anyway you see fit. To learn how to create a Spider, go through Scrapy’s tutorial first, and then follow up on some of the pages on the website as needed.
At a high level, Scrapy Spiders start with a URL or set of URLs, and send requests to the URL(s) to get some HTML. From here, you can define CSS selectors or XPath expressions to search for specific data in the HTML. Then, you can choose to yield an Item containing some data of interest, or a new URL to continue crawling the website.
Throttle your spiders
Always remember to throttle your spiders. When you start a spider, if you’re not careful it could crawl the site too quickly. When this happens you could crash the site’s server, earn yourself an IP ban, and ruin someone’s day. Save yourself the trouble and enable Scrapy’s AutoThrottle extension right away.

The setup is pretty simple, just set the variable to enable it, and set the target frequency:
AUTOTHROTTLE_ENABLED = True
# The average number of requests Scrapy should be sending in parallel to
# each remote server
AUTOTHROTTLE_TARGET_CONCURRENCY = 3.0
Set your User-Agent
Another important thing to keep in mind is to set your User-Agent header. It’s essentially an identification of the program that is accessing the website. Even your internet browser sends a User-Agent to identify itself. By default, Scrapy’s User-Agent is Scrapy/VERSION (+https://scrapy.org). This may very well get your spider banned straight away. So, either set a custom User-Agent, or choose your browser’s User-Agent in your settings.py.
Retry failed requests
The internet isn’t perfect, sometimes servers are down, sometimes your wifi is spotty, sometimes squirrels are chewing on datacenter wires. So, in the event of a failed request, you definitely want to retry at least a couple of times. Scrapy provides a Downloader Middleware, called RetryMiddleware, to do exactly that. Just indicate that you want to use this middleware in your settings.py file, and set the number of times you want to retry:
DOWNLOADER_MIDDLEWARES = {
  'scrapy.downloadermiddlewares.retry.RetryMiddleware': 820,
}
RETRY_TIMES = 3
Cache your responses
As you’re actually implementing your Spiders, you’ll need to run them quite often. It would be frustrating if you had to wait five minutes, or even an hour, every time you made a small code change. Instead, if you cached your responses from earlier runs, your Spiders could finish in a couple of seconds in most cases. Luckily, Scrapy will cache your requests if you just set up a few variables in settings.py:
HTTPCACHE_ENABLED = True
HTTPCACHE_EXPIRATION_SECS = 604800
HTTPCACHE_DIR = 'httpcache'
# Don't cache pages that throw an error
HTTPCACHE_IGNORE_HTTP_CODES = [503, 504, 505, 500, 400, 401, 402, 403, 404]
Render pages with Javascript
As you experiment, you may notice that the HTML that your Spider gets is missing a lot of the content you see in your browser. That’s because your browser not only parses and displays the HTML, but it also runs linked CSS and Javascript files. The CSS files just change the styling of the HTML, so you don’t need to worry about them. However, these days many websites render a lot of their content with Javascript. So, if you only parse the HTML in Scrapy, you’ll be missing all of the content that’s added by Javascript.
Luckily, there is a way to get the HTML after the Javascript files have been executed. Scrapinghub, which maintains Scrapy, also maintains a Javascript rendering service called Splash. To integrate it with Scrapy, there is a library called scrapy-splash. The scrapy-splash library exposes a Downloader Middleware, which interfaces with a Splash server running on your computer.
In order to run the Splash server, you first need to install Docker. Then, you can easily run a Splash server on port 8050:
sudo docker run -p 8050:8050 scrapinghub/splash --max-timeout 300
Now, there are couple of steps to integrate Splash and Scrapy properly. First, you need to set up the Downloader middleware:
DOWNLOADER_MIDDLEWARES = {
  'scrapy_splash.SplashCookiesMiddleware': 723,
  'scrapy_splash.SplashMiddleware': 725,
  'scrapy.downloadermiddlewares.httpcompression.HttpCompressionMiddleware': 810,
  'scrapy.downloadermiddlewares.retry.RetryMiddleware': 820,
}
Then, in order to make sure your spiders know where Splash is running, point to it in your settings.py:
SPLASH_URL = 'http://localhost:8050'
Next, make sure that Scrapy’s RetryMiddleware is compatible with Splash:
DUPEFILTER_CLASS = 'scrapy_splash.SplashAwareDupeFilter'
Finally, make sure that Scrapy’s HTTP cache can handle Splash responses:
HTTPCACHE_STORAGE = 'scrapy_splash.SplashAwareFSCacheStorage'
Now you’re all set to scrape any website without fear of missing out on some data.
Storing the data
Scrapy is great for crawling through websites and extracting information. But a stream of Items isn’t a great interface for analyzing your data, and you certainly don’t want to re-crawl a website everytime you want to analyze the data. So, we need to store it in a way that’s easy to analyze. That’s where SQLite comes along. It’s a dead-simple SQL database that just lives in a file.
Now, you’ve got a Spider producing items, and you have a SQLite file to store all of them. Let’s talk about how to get those items into SQLite. Conceptually, I think of each Item class as corresponding to a table. So, if I’m scraping every player in NFL history, I’ll make a Player item. Then in SQLite I’ll create a players table. Each Item class corresponds to a SQLite table, and each instance of that Item class is a row in the SQLite table.
I’ve found this general template useful for defining Scrapy items that will be persisted in SQLite:
class Player(scrapy.Item):
  # define fields

  @staticmethod
  def sql_create(database):
    database.execute('''
      CREATE TABLE IF NOT EXISTS
      players (
        // column names
      )
    ''')

  def sql_insert(database):
    database.execute('''
      INSERT OR REPLACE INTO
      players (
        // column names
      ) VALUES (
        // column values
      )
    ''')
The sql_create method creates a table to hold that class of items, and the sql_insert method inserts the specific instance of that item into the table.
The advantage of using SQLite is not that it just stores your data. You could do that by just writing the items to a file. But, SQLite helps you organize your data, not just store it. Having your data organized in tables allows you a lot of flexibility in your analyses. Best of all, SQLite is supported out of the box by Python.
Now that your items are set up, you can create a Scrapy Pipeline. Pipelines perform post-processing on items once they’ve been scraped by spider. You can create a Pipeline that creates all the necessary tables first, and then inserts each item into SQLite as it comes in.
Analyzing the data
Now that the data is living in SQLite, you need a way to interactively query and visualize it. That’s where Jupyter notebooks come in. Install Jupyter with Pipenv and start the notebook server to open the interactive notebook editor in your web browser:
pipenv install jupyter
jupyter notebook

As you can see there are cells where you can enter Python code to perform some work. Then, the output cells will render the output of the operation.
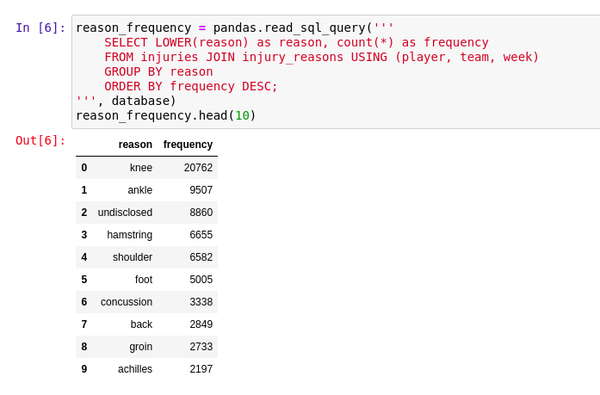
Querying the data
You can read data from SQLite using a Pandas DataFrame. Pandas is widely used for data science, especially in Jupyter notebooks and Colabs. It provides a nice API for reading and manipulating tables of data. It also formats your data nicely if you need to present it. Make sure you install it with Pipenv:
pipenv install pandas
Visualizing the data
Once you load the data into DataFrames, it becomes easy to then visualize the data with Seaborn. Seaborn is a more user-friendly wrapper around Matplotlib. Seaborn makes working with Matplotlib a little bit easier by providing a simpler API. When you install Seaborn, make sure you also install Matplotlib:
pipenv install matplotlib seaborn
Parting thoughts
All in all, this isn’t a brand new innovative stack. But, I wasn’t able to find any guides online that talked through the entire process end-to-end, so I wanted to just fill that gap. To summarize, with this stack you should be able to:
- Scrape data from websites, even if they require Javascript to parse.
- Create a pipeline to organize and store your data in a SQLite database.
- Query and visualize the data in a Jupyter notebook.
Hope you found this guide helpful, and feel free to use my nfldata project as a reference.
Let me know what you think about this article by leaving a comment below, reaching out to me on Twitter or sending me an email at pkukkapalli@gmail.com